Introduction
Last modified:
Post Purchase Upsell for WooCommerce is a plugin which makes it possible for you as a merchant to display relevant products to the buyer after their purchase is complete. They are then given the possibility to update the placed order.
- Post Purchase Upsell for WooCommerce support High-Performance Order Storage (HPOS) as of version 3.1.0.
Requirements
Requires WooCommerce together with a payment plugin from a provider that allows adding products post purchase.
It also supports the WooCommerce standard payment methods Direct bank transfer, Check payments and Cash on delivery.
The plugins that currently have support for Post Purchase Upsell are:
- Avarda Checkout for WooCommerce
- Kustom Checkout for WooCommerce along with Klarna Order Management
- Klarna for WooCommerce
- Qliro for WooCommerce
- Walley Checkout for WooCommerce
You can read more about how to configure the payment plugins, if needed, and which limitations apply.
Please note that Post Purchase Upsell is block based. If you have some sort of classic editor plugin activated, Post Purchase Upsell will not work.
Installation and activation
- Download the .zip file
- Go to: WordPress Admin → Plugins → Add New and upload the file via Upload plugin.
- Install Now and Activate.
Configuration
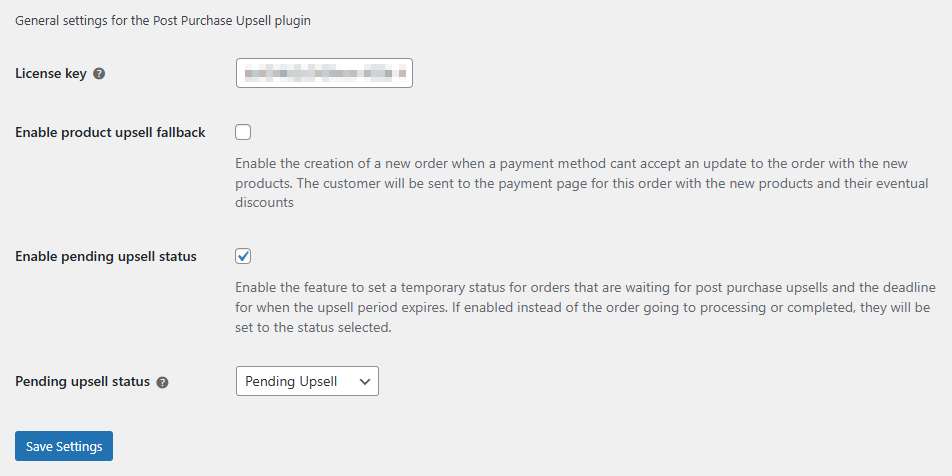
Navigate to Post Purchase Upsell → Settings
- License key – Enter your plugin license key
- Enable product upsell fallback – Enable the creation of a new order when a payment method cannot accept updates to an existing order.
The customer is redirected to the payment page for the new order, including the updated products and any applicable discounts.
Read more in the Fallback order flow section. - Enable pending upsell status – Enable the feature to set a temporary order status for orders waiting for post purchase upsells, along with a deadline for when the upsell period expires.
While active, orders will be assigned the selected temporary status instead of moving to Processing or Completed.
Once the upsell period expires, the order status will automatically transition to the status WooCommerce would have originally applied if this feature were not enabled. - Pending upsell status – Select the order status to use for orders waiting for ppost purchase upsells to be accepted or rejected by the customer.
You need to enable pending upsell status and save the setting for this to appear. This is because the new status Pending Upsell isn’t registered until the setting is activated.
Please note that the setting Enable pending upsell status requires the upsell offer to have a urgency time set either through the offer or a payment gateway.
Default upsell
The plugin comes with a pre-configured drafted Default upsell.
To edit the Default upsell, or any other created Upsells, you navigate to Post Purchase Upsell → All Upsells and click the Title of your Upsell, or the Edit text that appears when you hover the section.

Add new Upsell
To add a Post Purchase Upsell rule you navigate to Post Purchase Upsell → Add new.
You can also navigate to All upsells and click the Add new button at the top of the screen.

A new Upsell comes pre loaded with a basic default style and a number of default blocks, which you can configure to fit your needs.
Name your Upsell
Like with any Page or Post in WordPress you need to give your Upsell a title/name. We recommend that you set a title that will help your set this apart from your other Upsells, it will not be publicly visible.


Set Upsell rules
Set the rules on top level for when you want your Upsells to be displayed.
- Always – This Upsell offer will always be displayed. As long as the order contains at least one product that triggers it.
- Product – Here you can decide what product(s) the order must contain for this Upsell rule to be applied.

An example:
You have Linked Products offer set up, where you offer Upsells when an order includes products A, B or C.
With the Always setting it is enough that an order includes at least one of these products for the Upsell offers to be displayed.
However, if you apply the Product setting and state that product C must must be included in the order, no Upsell offers will displayed if the order only includes A or B, even though they are linked.
Set Upsell attributes
If you have multiple Upsells set up, you can set the order in which they should be prioritized here.
This can be used if you want to have different Upsells based on what your customer buys. This is also useful as a fallback if products are out of stock.

An example:
You have set up an Upsell with the Product offer block where you always offer product B, C and D, no matter what products the initial order included. But you might want to offer product B and C with a discount if the placed order includes product A. Then you set up a new Upsell with the Linked Product offer block configured for a discount and the products linked correctly. You then set the order to 1 for this Upsell, and the other to 2.
This way you have set it so that any customer who bought product A will be offered to add B and C with a discount, but all other customers will be offered B, C and D at the regular price.
Edit and Add blocks
Within your Post Purchase Upsell Offer Block you have a number of default blocks added. You can add, edit and/or remove blocks according to your own preferences. The default blocks are a main Heading, Secondary heading, the Urgency timer and the Linked products offer blocks.

To edit a Block you click it to access its settings.
Please note that if some of the changes you make here might be overridden by your theme or styles.

To delete a Block you click the three dots in the toolbar to access additional settings.

Please note that you need to use either Linked products offer, Products offer or Coupon upsell offer. It is required that you include one of these blocks, or there will be no upsells/coupons displayed.
You can only add one offer block. You can not add two different or two of the same.
Learn more about how to configure these blocks in the Post Purchase Upsell Blocks article.
To add a block you can either hover between two existing blocks to access the Add block function, or click the Add block button that appears at the bottom of the parent block when it’s selected.

To read more about the different blocks included in Post Purchase Upsell and their specific settings, please see the Post Purchase Upsell Blocks article.
Publish your Upsell
When you are done, click the Publish button at the top right corner.
If you are editing an existing Upsell, click Update.
If you are using either the Product offer or Coupon upsell block, you can now Test Post Purchase Upsell. However, if you use the Linked Products offer you need to link your products first.
Linked Products or Product offer
When using the Linked products offer block, you need to set up links between products. This way you can present offers based on what the customer bought.
With the Products offer block you always offer product(s) as upsells on the Thank you page.
The products you select in this block will always be presented to your customer after a placed order, regardless of which products the order contained.
Read more about the differences and how to configure these blocks in the Post Purchase Upsell Blocks article.
Coupon upsell offer
If you don’t want to offer product upsells, or need a fallback offer you can use the Coupon upsell offer block.
You can offer a fixed amount or percentage, as well as apply free shipping and add an expiration time.
Read more about how to configure this block in the Post Purchase Upsell Blocks article.
Link your products
When you are using the Linked Products offer block you need to set up the links between products. Unlike the Product offer block, where you decide the offers, regardless of which products the order contained.
Navigate to Products → All Products and click on the product you wish to configure.
Below the Product description metabox you will find the box called Product data. In this box you have section Linked Products.
In this section you have three options on how you want to link your products: Upsells, Cross-sells and Post Purchase Upsells. If you have e.g. Post Purchase Upsells set as the Linked type in your Linked Products offer block, you add the products that should be presented on the Thank you page after a placed order in the Post Purchase Upsells box. The same applies to Upsells and Cross-sells.
You can read more about the differences between Upsells, Cross-sells and Post Purchase Upsells in the Post Purchase Upsell Blocks article.

If you can’t find the Product data metabox, expand the Screen Options in the top right corner of the page and make sure the box is checked.
You can also make sure it’s not located further down the page since the Edit product page layout can be customized and might look different in your environment.
Configuration payment plugins
WooCommerce standard payment methods
The WooCommerce standard payment methods Direct bank transfer, Check payments and Cash on delivery does not have any specific settings for Post Purchase Upsell.
Avarda Checkout for WooCommerce
Avarda Checkout for WooCommerce does not have any specific settings for Post Purchase Upsell. However, it requires that the customer has chosen a non direct payment method (invoice, account…) and that the merchant has an agreement with Avarda to allow upsells. In this agreement you also set the allowed upsell percentage.
Kustom Checkout for WooCommerce
Kustom Checkout for WooCommerce does not have any specific settings for Post Purchase Upsell. However, Kustom require a non direct payment method (invoice, account…) to allow upsells.
Please note! The average default allowed upsell amount is 15% of the original order. The percent can vary between different customers as well as in your agreement with Kustom.
Klarna Payments for WooCommerce
Klarna Payments for WooCommerce does not have any specific settings for Post Purchase Upsell. However, Klarna require a non direct payment method (invoice, account…) to allow upsells. The customer can not be flagged for bad creditworthiness by Klarna.
Please note! The average default allowed upsell amount is 15% of the original order. The percent can vary between different customers as well as in your agreement with Klarna.
Qliro for WooCommerce
- Navigate to WooCommerce → Settings → Payments → Qliro
- Scroll down to Upsell at the bottom of the settings.
- Upsell percentage – Set the max amount above the order value a customer can add to a Qliro order paid with a Pay later payment.

Payment Before delivery
- Pay by card – Card payments have a fixed upsell limit of 300 SEK, or the equivalent in your local currency (for example, €30). This limit is enforced by Qliro and cannot be modified in the plugin.
- Pay by Swish – When paying by Swish, there is no upsell limit. The payment for the additional products is made at the same time as the updated order is finalized by the customer.
- Directly from your bank – When paying by bank transfer, there is no upsell limit. The payment for the additional products is made at the same time as the updated order is finalized by the customer.
Pay later
For Pay later payments, the default upsell limit is an additional 10% of the original order value. To allow a higher limit, you first need to contact Qliro.
Walley Checkout for WooCommerce
Walley Checkout for WooCommerce does not have any specific settings for Post Purchase Upsell. However, Walley require a non direct payment method (invoice) to allow upsells.
Please note! The average default allowed upsell amount is 10% of the original order. The percent can vary, depending on the size of the order. Also note that Walley can deny an upsell. If you want to know why an upsell has been denied by Walley, please get in touch with Walley support.
Test Post Purchase Upsell
To test if you have the Post Purchase Upsell plugin configured correctly you can follow these steps:
- Place an order. Preferably in test mode using test credentials and/or on a staging site if you are using a supported payment plugin.
You can also use one of the WooCommerce standard payment methods Direct bank transfer, Check payments or Cash on delivery.
If you are using Linked products offer the order needs to include a product where you have configured Linked Products. - Add products to your order. When your order is placed and you have been redirected to the Thank you page, Post Purchase Upsell will appear at the top of the page. Add one, or several, products and click Confirm.

- You should now see a message stating the product(s) added to your order. Scroll down to Order details to confirm that all products are listed, including those recently added.
