Introduction
Last modified:
Walley Checkout for WooCommerce was previously known as Collector Checkout for WooCommerce and there may be some remnants of this in the documentation or plugin. For instance in the code snippets and/or some of the settings.
Walley Checkout for WooCommerce is a plugin that extends WooCommerce, allowing you to take payments via Walley.
Walley Checkout does not support the Checkout block i WooCommerce.
You can read more about this here.
Sign up with Walley
To get started with Walley Checkout, you need to create an account with Walley. If you’re not a customer yet you can register here.
Testing
If you want to try the checkout before installing it in your store you can checkout our demo store here.
To make test purchases you also need customer test data. This information can be found here.
Installation
- Login to WordPress Admin. Navigate to Plugins → Add New (in the left column menu).
- Click on the Upload Plugin option, then click Browse to select the zip file from your computer. Once selected, press OK and press the Install Now button.
- Activate the plugin.
Required WordPress & WooCommerce settings
- Installing HTTPS (a SSL/TLS certificate) in your web store is strongly recommended.
- Make sure that you have enabled pretty permalinks in your WordPress installation. Otherwise callbacks from Walley back to your store won’t work and orders will not be updated with the correct order status/information.
- To get the order total to match between WooCommerce and Walley you need to configure WooCommerce to display prices with 2 decimals. More information about displaying of prices and how it can cause rounding issues can be found in this article.
- You need to enable Guest Checkout (or let WooCommerce generate user name and password automatically when creating an account) in your store, otherwise the order will not be finalized in WooCommerce when paying with Walley.
- It’s recommended to add/use SKU on products (even on product variants). This is needed to keep track of purchased products in orders between the two systems and to make refunds working properly.
- Your checkout page must use the Classic Shortcode block. Walley Checkout does not support the Checkout block at this point. You can read more about this here
- You can not alter, or add to, the
[woocommerce_checkout]shortcode when this is used.
Configuration
Before you get started you need to make sure you are using the checkout shortcode on your set Checkout Page.
The Checkout block is the default for new WooCommerce installations as of version 8.3. Walley Checkout for WooCommerce does not yet support this.
Go to Pages → your set Checkout Page and transform the Checkout block to the Classic Shortcode block.

- Navigate to → WooCommerce → Settings → Payments → Walley Checkout.
Basic settings
- Enable Walley Checkout by ticking the Enable Walley Checkout checkbox.
- Title – Enter the title for the payment method displayed in the checkout and order confirmation emails.
- Username – Your Username received from Walley.
- Shared key – Your Shared Key received from Walley.
- API Client ID – Enter your Walley Checkout API Client ID.
Used for Walley’s new Checkout and Management API. If entered this API will be used instead of the old API. - API Secret – Enter your Walley Checkout API Secret.
Used for Walley’s new Checkout and Management API. If entered this API will be used instead of the old API. - Password – Your Password received from Walley.
Used for Walley’s old SOAP based Payments API (for order management). - Display checkout privacy policy – Select where to display the privacy policy text. You can choose to Display above checkout, Display below checkout or Do not display.

Country credentials
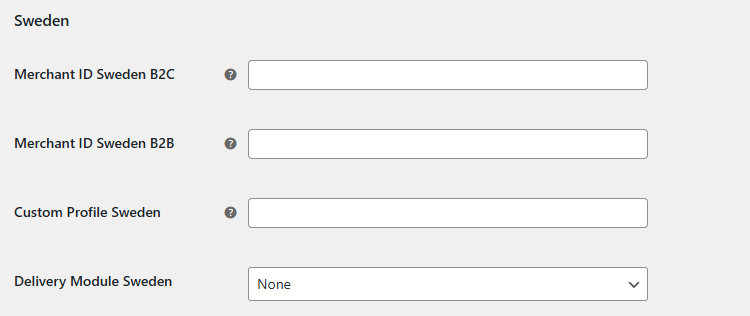
- Merchant ID “Country” B2C – Your Merchant ID for B2C purchases received from Walley.
Make sure you input the correct information in the field for the country/countries you have an B2C agreement with Walley for – Sweden, Norway, Finland, Denmark or EU. - Merchant ID “Country” B2B – Your Merchant ID for B2B purchases received from Walley.
Make sure you input the correct information in the field for the country/countries you have an B2B agreement with Walley for – Sweden, Norway, Finland, Denmark or EU. - Custom Profile “Country” – Enter the shipping profile, which you receive from Walley, that you want to use.
- Delivery Module “Country” – Select the Delivery Module you want to use from the dropdown menu. Choose None if you do not want to use a delivery module.
Using a delivery module requires a separate agreement with Walley and the shipping provider.
See How to configure Walley Shipping Module for setup instructions.
Make sure to select the module corresponding to the country or countries you have an agreement for: Sweden, Norway, Finland, Denmark or EU.
Checkout settings
- Checkout layout – select the Checkout layout. Choose between
- Two column checkout (Walley Checkout in left column)
- Two column checkout (Walley Checkout in left column) – Storefront light
- Two column checkout (Walley Checkout in right column)
- One column checkout.
You can preview the different layouts in the Default layouts of the Checkout page section of Customize the Checkout page documentation.
- Default customer – Sets the default customer/checkout type for Walley Checkout (if offering both B2B & B2C).
- Checkout button color – Select your custom background color of call to action buttons in Walley Checkout iframe. Leave blank to use Walley standard color.
- Electronic ID fields – Tick the checkbox to activate Requires Electronic ID Fields settings in product pages.

If Electronic ID fields is activated a Walley Electronic ID required setting is added to all Edit product pages.
If a product with Walley Electronic ID required checked is added to cart, Walley will require Electronic ID signing (e.g. Mobile Bank ID) before the purchase can be placed. This setting is found when you edit a product, at the bottom of the Product data → General section:
This setting help minimize the risk of a fraudulent purchase on credit products. For products that are delivered electronically the customers needs to identify themselves with each purchase.
When it comes to products that are not delivered electronically there is a window of a few minutes after purchase where the customer is remembered. If another purchase is made within this time the requirement of identification is not applied.
This feature does not validate the age of the customer and is supported for credit payments for B2C and B2B on the Swedish, Norwegian and Finnish markets.
Please note that this setting only affect payments with Walley. If the customer choose another payment method this setting does not apply.

Order management settings
- Manage orders – Check this box if you want to cancel an order in Walleys system automatically when the order is marked as Cancelled in WooCommerce and activate an order/invoice in Walleys system automatically when the order is marked as Completed in WooCommerce.
- Invoice number on order page -Tick the checkbox if you want to display Walley Invoice Number after WooCommerce Order Number on WooCommerce order page (→ WooCommerce → Orders).
- Activate individual order lines – Check this box to activate each order line instead of the the entire order.
- Activate rounding order line – If checked, an extra rounding order line will be sent to Walley if the sum of all order lines does not match WooCommerce cart/order total.

Test Mode settings
- Test mode – Check this box if you want to make purchases using test credentials.
- Debug – Enable logging. The log messages can be displayed by navigating to: → WooCommerce → Status → Logs.

Part Payment Widget
The Part Payment Widget is available for placement on the Product pages and on the Cart page.
- Enable the widget – Check this box to enable the display of the Part Payment Widget.
- Placement – Select where you want to display the Widget.
For the Product pages you can chose between Above Title, Between Title and Price, Between Price and Excerpt, Between Excerpt and Add to cart button, Between Add to cart button and Product meta, Between Product meta and Product Sharing buttons, After Product sharing buttons and Custom placement.
Placement – Select where you want to display the Widget.
For the Product pages you can chose between Above Title, Between Title and Price, Between Price and Excerpt, Between Excerpt and Add to cart button, Between Add to cart button and Product meta, Between Product meta and Product Sharing buttons, After Product sharing buttons and Custom placement.
For the Cart page you can chose between Above Cross sells, Above cart totals, Between Cart total and Proceed to checkout button, After Proceed to checkout button, Bottom of the page and Custom placement.

Custom placement settings:
- Custom placement hook – Enter your own action that you want to use for the placement of the widget.
- Custom placement hook priority – Enter the priority for the custom hook you want to use.

Order management
When an order is created in WooCommerce and a reservation number exists in Walleys system, you have the possibility to handle the order management in Walley directly from WooCommerce. This way you can save time and don’t have to work in both systems simultaneously.
Read more about order management in Walleys system directly from WooCommerce in the Walley Checkout Order management documentation.
Subscription support
Walley Checkout is compatible with the WooCommerce Subscriptions extension for handling recurring payments.
Read more about recurring payments with Walley Checkout here.
Currencies
The plugin itself has no limitations regarding currency.
However, please note that there can be limitations in the agreement you have with Walley.
When it comes to questions regarding supported currencies you should always talk to your payment provider. The exception is when the plugin in fact do have limitations.
You can read more about this at the Walley website.
Customize the checkout page
In some scenarios there might be a need for modifying the checkout page. Learn more how you can Customize the Walley checkout page here.