Install and activate
Last modified:
This guide will help you set up Klarna and Klarna Payments for WooCommerce, from installation to your first successful test purchase.
Follow the steps below to connect your Klarna account, configure required WooCommerce settings, and verify that orders are processed correctly in both WooCommerce and Klarna Merchant Portal.
Please note that all references to Staging and Live in this guide refer to the settings in the Klarna plugin. These should not be confused with the WooCommerce Site Visibility settings, which add a Live (or Coming soon) label in the admin interface.
Getting started with Klarna for WooCommerce
Step 1 – Required WooCommerce settings
Before testing Klarna, make sure your store is properly configured:
HTTPS
Your site must use a SSL/TLS certificate (https://) for Klarna for WooCommerce to work.
Permalinks
Set to “Pretty permalinks” under WordPress Settings → Permalinks.
Otherwise callbacks from Klarna back to your store won’t work and orders will not be updated with the correct order status/information.
Read more about pretty permalinks.
Terms and conditions
First, make sure you have created and published a Terms and Conditions page.
Next, assign this page in WooCommerce:
Go to WooCommerce → Settings → Advanced, then locate the Page setup section and ensure that your Terms and Conditions page is selected.
Decimals
To get the order total to match between WooCommerce and Klarna you need to configure WooCommerce to display prices with 2 decimals.
Go to WooCommerce → Settings and scroll down to Currency options under the General tab to set the Number of decimals.
More information about displaying of prices and how it can cause rounding issues can be found in this article.
Currency
Each Klarna country has its own set of country specific settings. You need an agreement with Klarna for each country enabled and your store needs to be able to process purchases in the local currency.
A list of available countries, locales, and currencies for Klarna Payments can be found at the Data mapping settings in the Klarna Docs.
If you sell in multiple countries, you may need a multi-currency plugin — this can be added later.
Step 2 – Install Klarna for WooCommerce
If you haven’t already installed the Klarna for WooCommerce plugin, you can do so in one of the following ways:
- From your WordPress Admin:
Go to Plugins → Add New → Search for “Klarna for WooCommerce” → Install → Activate - From WooCommerce.com:
Add the plugin to your store from WooCommerce.com. - From WordPress.org:
Download the plugin as a .zip-file from WordPress.org, then upload and activate it from your WordPress admin panel.
You can also download the .zip directly through this link.
Step 3 – Klarna account setup
You’ll need a Klarna account to connect WooCommerce to Klarna.
There are two different Klarna environments – Test (Playground) and Live (Production).
Test and Live accounts are separate. Each uses its own login portal and you’ll need separate credentials for each.
If you already have a Klarna account for your intended purpose (Test or Live):
Continue to Step 4.
Otherwise, choose the environment you want to start with and create the corresponding account:
- Test account (Playground) – for setup and testing
→ Create one here: EU residents
→ Create one here: US residents
→ Create one here: AU residents - Live account (Production) – for real transactions
→ Apply for one here: Get started with Klarna
All account-related questions — such as merchant approval, region setup, or contract details — should be directed to Klarna Merchant Support.
Step 4 – Log in to your Klarna Merchant Portal
Now decide which Klarna environment you’ll connect WooCommerce to.
- Test mode (Playground):
Use this to verify checkout, order flow, and payment capture before going live.
→ Log in at http://portal.playground.klarna.com/ - Live mode (Production):
Switch to this once your store is ready for real customers.
→ Log in at https://portal.klarna.com/
If you have signed up for Klarna as a payment method through your existing provider you might need to log in through their portal/site.
You’ll use the corresponding API credentials from the (Test or Live) Merchant Portal in the next step.
It’s recommended to start in Test mode until you’ve verified your setup and checkout flow.
Step 5 – Retrieve your API credentials
When you are logged in to your Klarna Merchant Portal you can retreive your API credentials.
- Go to Settings → API Credentials.
- Click Generate new API credentials (or use existing ones if already created).
- Copy your:
- Username (UID)
- Password
These are the credentials you’ll enter in WooCommerce — not to be confused with your Merchant ID (MID) or Client ID, which are used for other Klarna integrations.
Step 6 – Add API credentials in WooCommerce
In your WordPress Admin, go to:
WooCommerce → Settings → Payments → Klarna → Manage
1. Add the countries where Klarna will be available as the payment method. Search and select them from the dropdown list. In this example we use Sweden.
2. Enable Test mode for playground testing (optional).
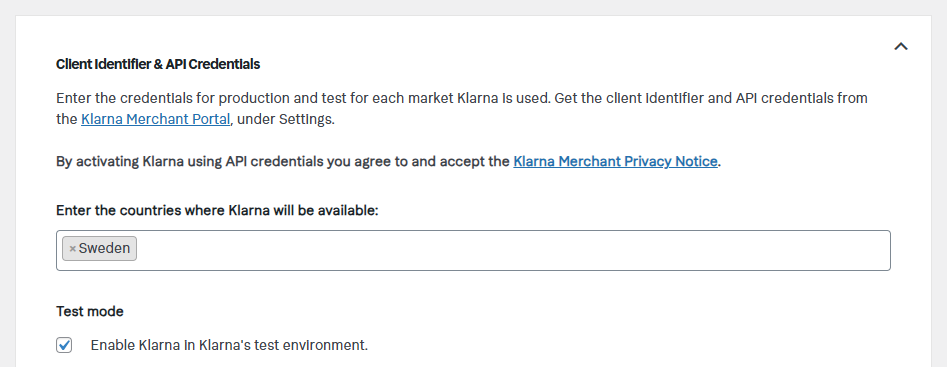
3. Enter the Username and Password for each European country you wish to activate Klarna as payment method.

Regional setup notes
If your Klarna account is for a specific market (e.g. Sweden, Germany, Netherlands), make sure:
- Your WooCommerce store currency matches that region’s Klarna setup.
- You use the correct API credentials for that market.
Klarna can also provide combined EU accounts covering multiple countries.
If you’re unsure whether your account supports this, contact Klarna Support for clarification before proceeding.
Step 7 – Enable Klarna Payments
1. Enable Klarna Payments by checking the box.
2. Enable Logging by selecting Yes in the dropdown.
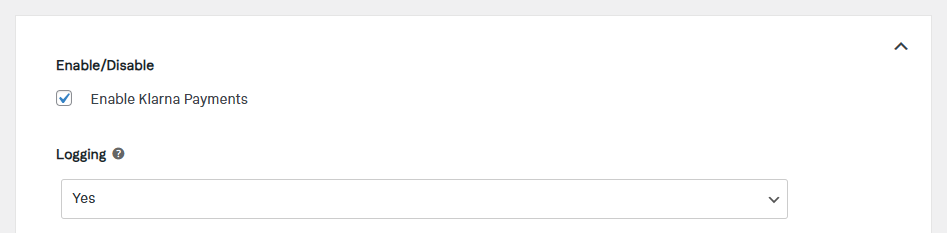
3. Scroll down to the bottom of the page and Save changes.
Step 8 – Configure shipping
If you only sell digital/downloadable products you don’t need to configure shipping and can skip to Step 9.
If you sell physical products, you must configure at least one shipping method.
Go to WooCommerce → Settings → Shipping and add at least one valid shipping zone and method.
Make sure it’s active and available during checkout.
You can read more about how you set up shipping in the official WooCommerce documentation.
Step 9 – Test the checkout
Perform a test purchase in your store.
- Test/Playground mode: You can use Klarna’s sample customer data for testing.
- Live/Production mode: You must use real customer data.
- Ensure the checkout loads properly and payments go through and that you are redirected to the thank you/confirmation page.
If anything goes wrong, check the Klarna logs (which you activated in step 7) under WooCommerce → Status → Logs
You can get help interpreting the logs in the Troubleshooting the checkout flow section of this documentation.
Step 10 – Verify orders in Klarna Merchant Portal
After a successful test order, log in to your Klarna Merchant Portal and confirm:
- The order is visible and the amount matches WooCommerce.
- Order status aligns correctly:
- Processing (Woo) = Authorized (Klarna)
- Completed (Woo) = Captured (Klarna)
If you manually change an order from Processing to Completed in WooCommerce, verify that the status updates accordingly in Klarna.
✅ Everything matches? You have successfully set up Klarna Payments in your store!
Remember to set up your store for Live (Production) if you have completed this guide using Test mode.
Begin again from Step 3 and make the necessary changes to switch your store to the Live environment.
If anything went wrong or it didn’t match, refer to the Troubleshooting section or contact Krokedil Support:
English: use the support form on krokedil.com to get help.
Svenska: använd supportformuläret på krokedil.se för att få hjälp.
Helpful information before you contact us can be found in the How to prepare a support ticket article.
Please note that all questions regarding a certain purchase and/or account related issues are to be directed at the Klarna Merchant Support.
Krokedil only answer technical questions or questions regarding the configuration.
Step 11 – Optional Add-ons
Klarna offers several additional features you can enable once your setup is complete:
See the respective sections in our documentation for detailed setup guides.