Configuration
Last modified:
Returns and Withdrawals adds a structured returns flow for WooCommerce stores. Customers can register a return from their account page (or a dedicated guest page), select which items to send back, choose between a refund or an exchange, and optionally buy return shipping from the store. Each return is saved as its own return order so it can be inspected, edited and refunded just like any other WooCommerce order.
It also adds a built-in withdrawal link that meets the requirements of the 2026 EU directive – accessible for both logged-in customers and guest buyers.
Required WordPress/WooCommerce settings
- WordPress 6.8 or higher
- WooCommerce 10.4.0 or higher
- PHP 7.4 or higher
Configuration
Navigate to WooCommerce → Settings → Returns and Withdrawals.
General settings
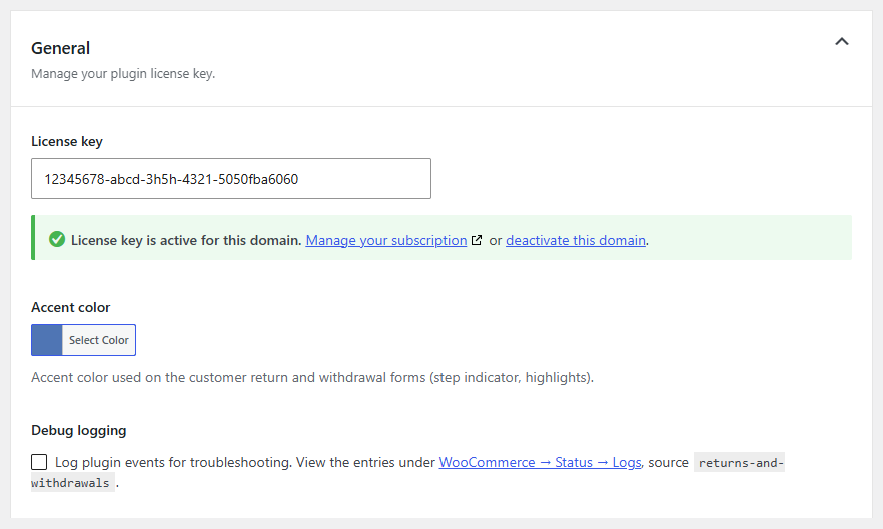
General behaviour of the plugin.
- License key – Your Krokedil license key. Required for updates.
- Accent color – Set the accent color used on the customer return and withdrawal forms (step indicator, highlights)
- Debug logging – Log plugin events for troubleshooting. View the entries under WooCommerce → Status → Logs, source
returns-and-withdrawals.
Return settings
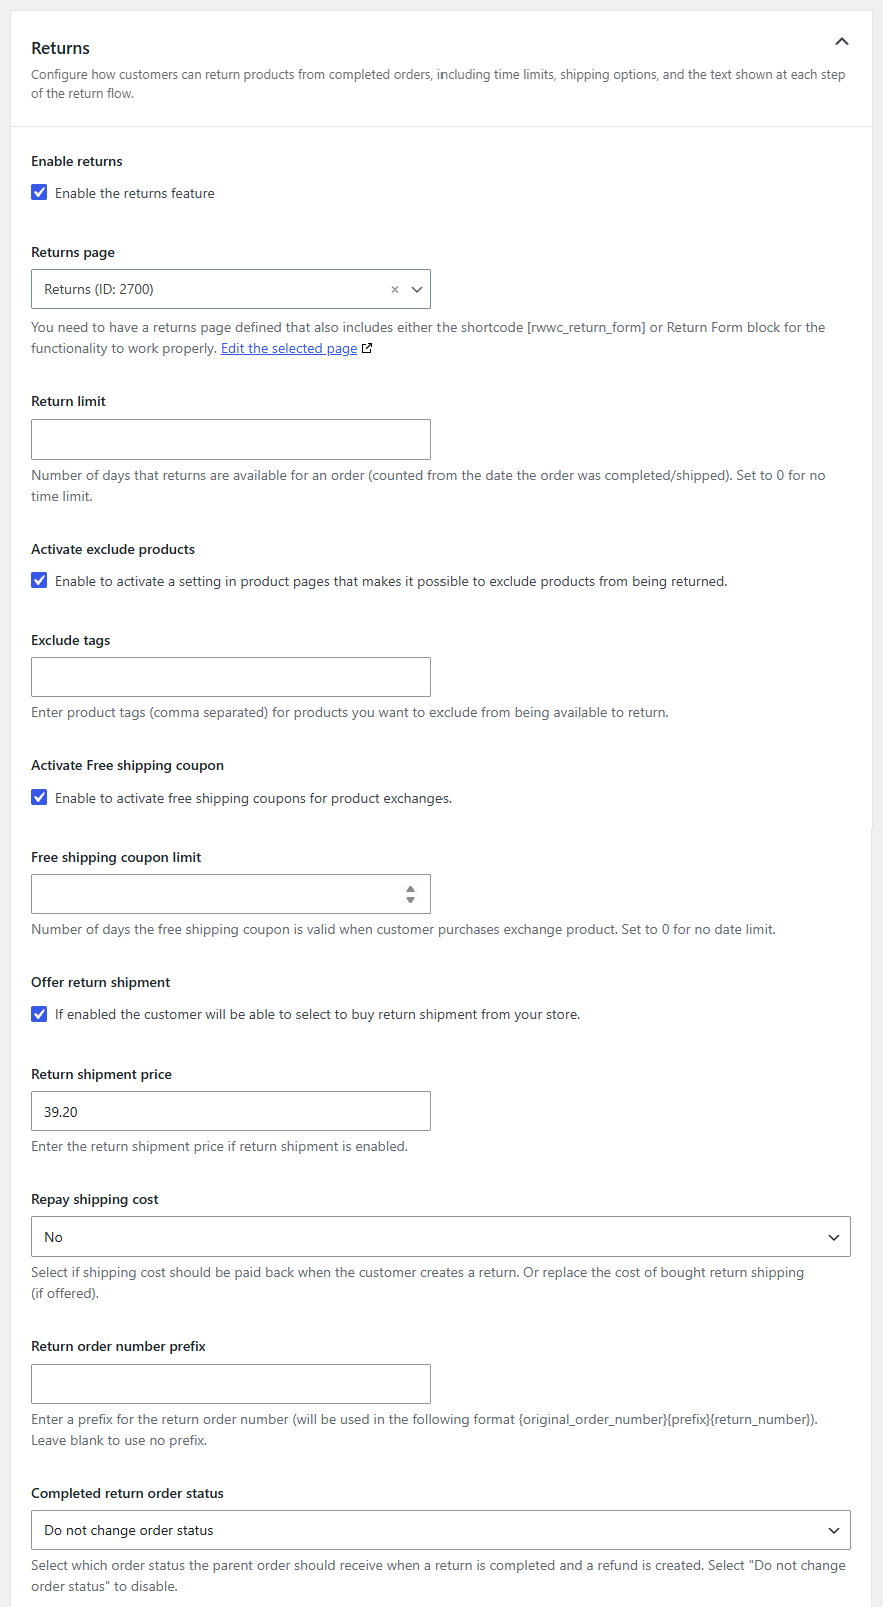
Configure how customers can return products from completed orders, including time limits, shipping options, and the text shown at each step of the return flow.
Check the Enable the returns feature box to activate returns and access the settings.
- Returns page – You need to have a returns page defined that also includes either the shortcode
[rwwc_return_form]or Return Form block for the functionality to work properly. - Return limit – Number of days after order completion that returns are still possible. Set to
0for no time limit. - Activate exclude products – Adds an Exclude from return checkbox to the product edit screen. See Excluding products.
- Exclude tags – Here you can add a comma-separated list of product tags. Products tagged with any of these tags cannot be returned.
- Activate Free shipping coupon – When enabled, a free-shipping coupon is generated each time a customer chooses to exchange an item. See Exchange coupon.
- Free shipping coupon limit – Number of days the exchange coupon stays valid. Set to
0for no expiry. - Offer return shipment – Lets the customer choose to buy return shipping from the store as part of the return flow.
- Return shipment price – The price the customer pays for return shipping when they choose to buy it.
- Repay shipping cost – Select if you want to include the original order’s shipping cost in the refund. Choose between Yes – but only when the entire order is returned or No.
- Return order number prefix – Optional prefix used between the original order number and the return sequence number. The format is
{original_order_number}{prefix}{return_number}. - Completed return order status – Select which status to set on the parent order when a return is completed and refunded. Select Do not change order status to leave the parent order untouched.
Customer return form
These fields control the headings, helper text, button labels and post-confirmation message shown to the customer during the return flow.
The defaults work out of the box but most stores will want to translate or rephrase them.
Include the return form on any page via the Return Form block or the [rwwc_return_form] shortcode.
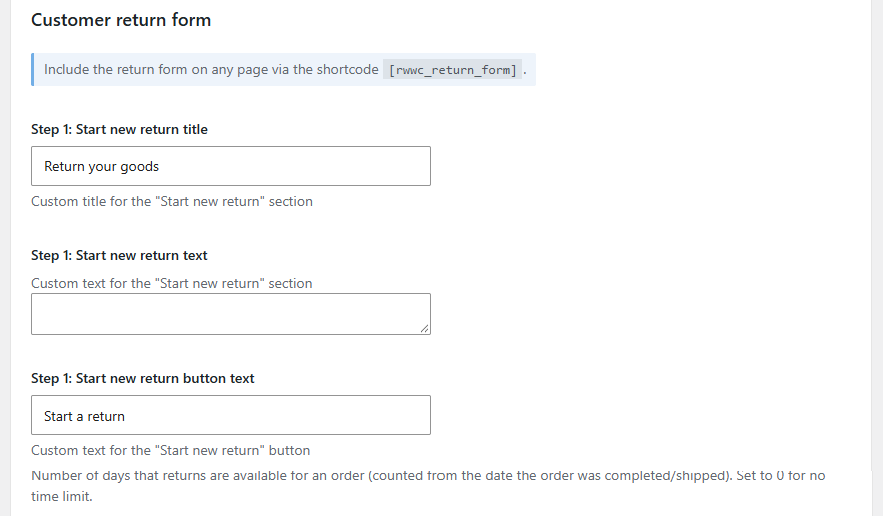
Step 1 – Start the return
- Step 1: Start new return title – Enter a custom title for the “Start new return” section.
- Step 1: Start new return text – Enter custom text for the “Start new return” section.
- Step 1: Start new return button text – Enter custom text for the “Start new return” button.
Step 2 – Select products
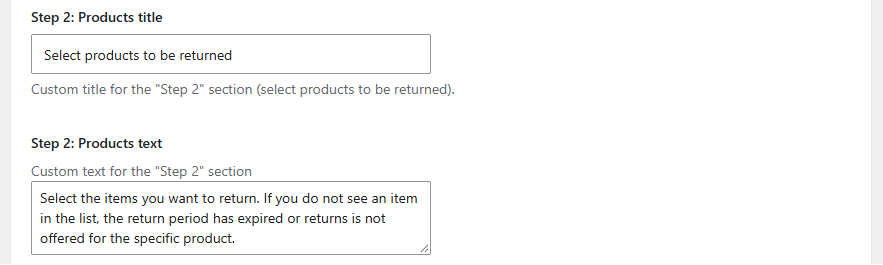
- Step 2: Products title – Enter a custom title for the “Step 2” section – where the customer selects the products to be returned.
- Step 2: Products text – Enter a custom text for the “Step 2” section.
Step 3 – Summary
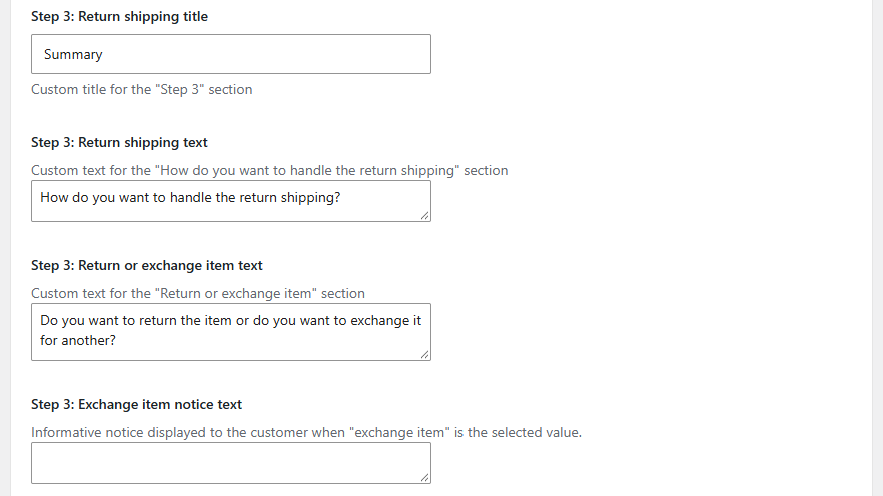
- Step 3: Return shipping title – Enter a custom title for “Step 3” section – where the customer selects how to handle return shipping.
- Step 3: Return shipping text – Enter a custom text for the “return shipping” section.
- Step 3: Return or exchange item text – Enter a custom text for the “return or exchange item” section.
- Step 3: Exchange item notice text – Enter the informative notice displayed to the customer when “Exchange item” is selected as the return option.
Step 4 – Confirmation
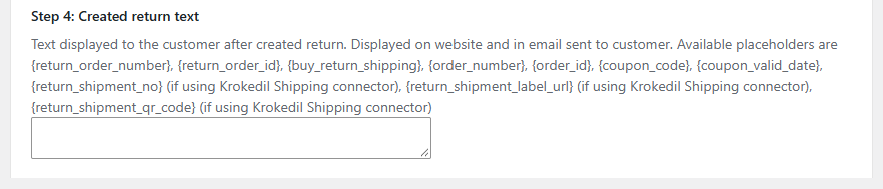
- Step 4: Created return text – Enter the text displayed to the customer after created return. This text is displayed on the website and in the email sent to the customer.
See the available placeholders further down on the page.
Withdrawal settings
Configure the right-of-withdrawal feature, which lets customers cancel orders within the statutory withdrawal period regardless of order status.
Check the Enable the withdrawals feature box to activate withdrawals and access the settings.
- Withdrawals page – You need to have a withdrawals page defined that also includes either the shortcode
[rwwc_withdrawal_form]or Withdrawal Form block for the functionality to work properly. - Withdrawal limit – Number of days after order creation that withdrawals are still possible, since withdrawals apply regardless of order status (unlike returns, which count from order completion). Set to
0for no time limit. - Activate exclude products – Adds an Exclude from withdrawals checkbox to the product edit screen. See Excluding products.
- Exclude tags – Here you can add a comma-separated list of product tags. Products tagged with any of these tags cannot be subject to withdrawals.
- Withdrawal order number prefix – Optional prefix used between the original order number and the withdrawal sequence number. The format is
{original_order_number}{prefix}{withdrawal_number}.
If left empty,-Wis used. - Completed withdrawal order status – Select which status to set on the parent order when a withdrawal is completed and refunded. Select Do not change order status to leave the parent order untouched.

Customer withdrawal form
These fields control the headings, helper text, button labels and post-confirmation message shown to the customer during the withdrawal flow.
The defaults work out of the box but most stores will want to translate or rephrase them.
Include the withdrawal form on any page via the Withdrawal Form block or the [rwwc_withdrawal_form] shortcode.
Step 1 – Start the withdrawal
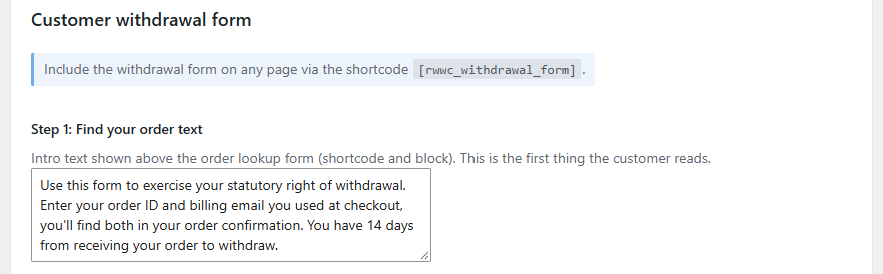
- Step 1: Find your order text – Intro text shown above the order lookup form (shortcode and block). This is the first thing the customer reads.
Step 2 – Select products
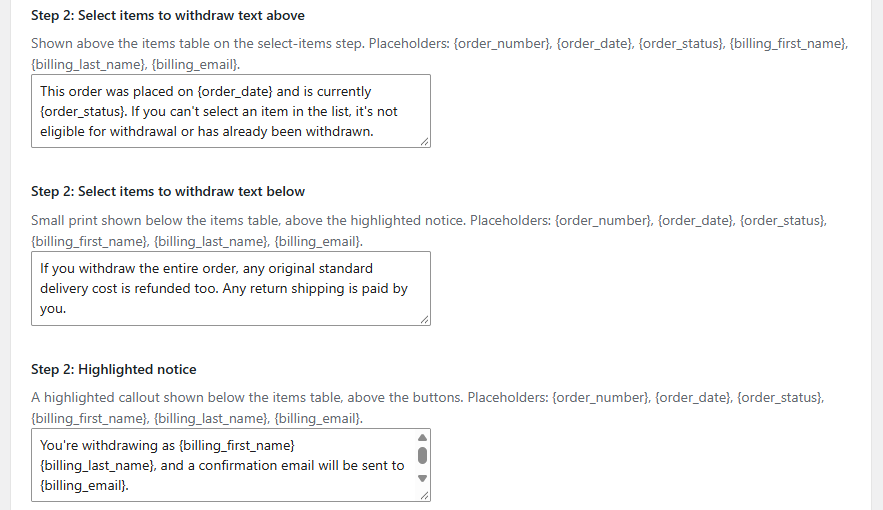
- Step 2: Select items to withdraw text above – Shown above the items table on the select-items step.
- Step 2: Select items to withdraw text below – Small print shown below the items table, above the highlighted notice.
- Step 2: Highlighted notice – A highlighted callout shown below the items table, above the buttons.
See the available placeholders further down on the page.
Step 3 – Confirmation
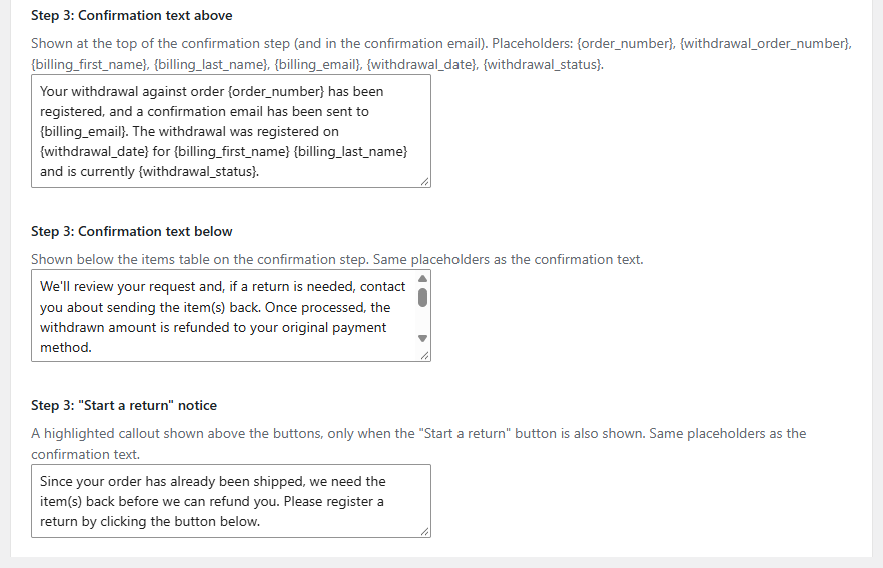
- Step 3: Confirmation text above – Shown at the top of the confirmation step (and in the confirmation email).
- Step 3: Confirmation text below – Shown below the confirmation step.
- Step 3: “Start a return” notice – A highlighted callout shown above the buttons.
The “Start a return” button (and this notice) only appear when returns are enabled, a returns page is configured, and the withdrawn order still qualifies for a standard return — i.e. it has already been shipped and falls within the return window. This lets customers who need to send the item back continue directly into the return flow. Same placeholders as the confirmation text.
See the available placeholders further down on the page.
Available placeholders
Returns
You can include these placeholders in the confirmation text. They are replaced with the relevant values when the message is rendered.
| Placeholder | Replaced with |
|---|---|
{return_order_number} | The number of the new return order. |
{return_order_id} | The internal ID of the return order. |
{order_number} | The original order number. |
{order_id} | The internal ID of the original order. |
{buy_return_shipping} | The customer’s choice for return shipping (yes/no). |
{coupon_code} | The exchange coupon code (if the customer chose to exchange). |
{coupon_valid_date} | The expiry date of the exchange coupon. |
{return_shipment_no} | The return shipment tracking number — requires Krokedil Shipping Connector. |
{return_shipment_label_url} | A link to the printable return label — requires Krokedil Shipping Connector. |
{return_shipment_qr_code} | The return shipment QR code — requires Krokedil Shipping Connector. |
Withdrawals
You can include these placeholders where noted in the plugin settings. They are replaced with the relevant values when the message is rendered.
| Placeholder | Replaced with | Used in |
|---|---|---|
{order_date} | The order date. | Step 2 |
{order_status} | The order status. | Step 2 |
{order_number} | The original order number. | Step 2 Step 3 |
{billing_first_name} | The First name entered in the Billing information. | Step 2 Step 3 |
{billing_last_name} | The Last name entered in the Billing information. | Step 2 Step 3 |
{billing_email} | The Email entered in the Billing information. | Step 2 Step 3 |
{order_id} | The internal ID of the original order. | Step 3 |
{withdrawal_date} | The date the withdrawal was registered. | Step 3 |
{withdrawal_status} | The Withdrawal order status | Step 3 |
{withdrawal_order_number} | The number of the new withdrawal order. | Step 3 |
{withdrawal_order_id} | The internal ID of the withdrawal order. | Step 3 |
Example:
Thanks for your return!

Your return number is {return_order_number} (linked to order {order_number}).

If you chose to exchange the item, use this coupon at checkout for free shipping:
{coupon_code} (valid until {coupon_valid_date}).

Print your return label here: {return_shipment_label_url}
Translations
All strings use the returns-and-withdrawals text domain. If you prefer to manage copy through a translation tool such as Loco Translate or Poedit instead of the settings UI, you can — leave the corresponding setting blank to fall back to the translated default.
Order statuses
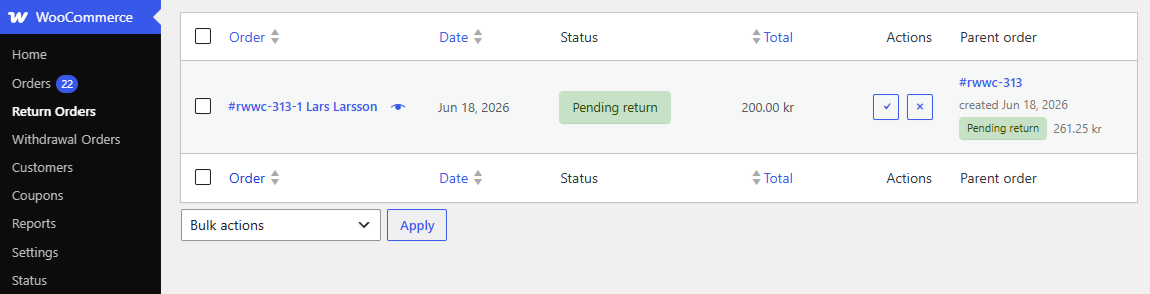
Pending return
The plugin registers a custom order status, Pending return (return-pending). Returns sit in this status until you process them.
See Processing returns for the admin workflow.
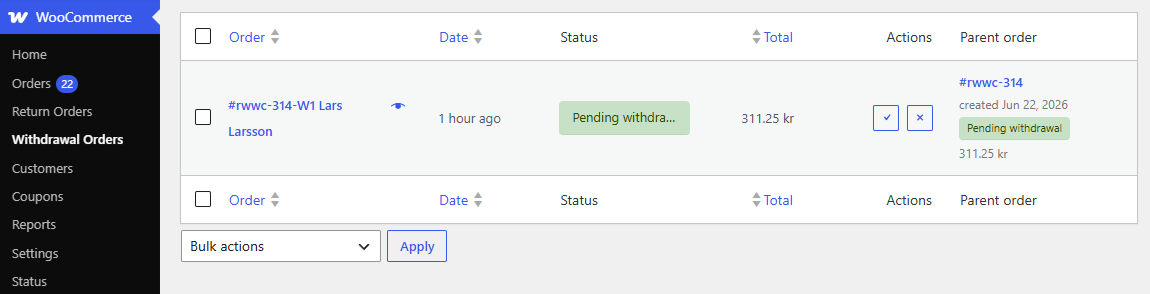
Pending withdrawal
The plugin registers a custom order status, Pending withdrawal (withdraw-pending). Withdrawals sit in this status until you process them.
See Processing withdrawals for the admin workflow.
Pending withdrawal and return
The plugin registers a custom order status, Pending withdrawal and return (wc-w-r-pending). Withdrawals that also have a return sit in this status until you process them.