Processing returns
Last modified:
Once a customer registers a return, the original order moves to Pending return status and a linked return order is created. From here, the merchant inspects, edits and finalises the return from the WooCommerce admin.
The Return order
Each return is stored as a separate order with the type shop_order_return.
The return order:
- Inherits its number from the parent order, optionally with the configured prefix and a sequence:
{original_order_number}{prefix}{return_number}. - Lists the items the customer selected, including quantities.
- Records the customer’s choices: return shipping option, return-or-exchange decision, and any message.
- Stores both the customer’s selections and admin notes in the order notes.
You can open a return order from the parent order’s Returns metabox or by browsing the Returns list.
The Return button on the parent order
On any Completed order, a Return button is shown next to the WooCommerce Refund button.
This lets a merchant start a return on the customer’s behalf – useful for returns reported by phone or email. The flow is the same as the customer-facing one and produces the same return order.

Completing a return
There are different ways to finalise a return.
Finalise a return from the Return Orders tab:
- Open the WooCommerce → Return Orders tab.
- Click the Complete order Action.

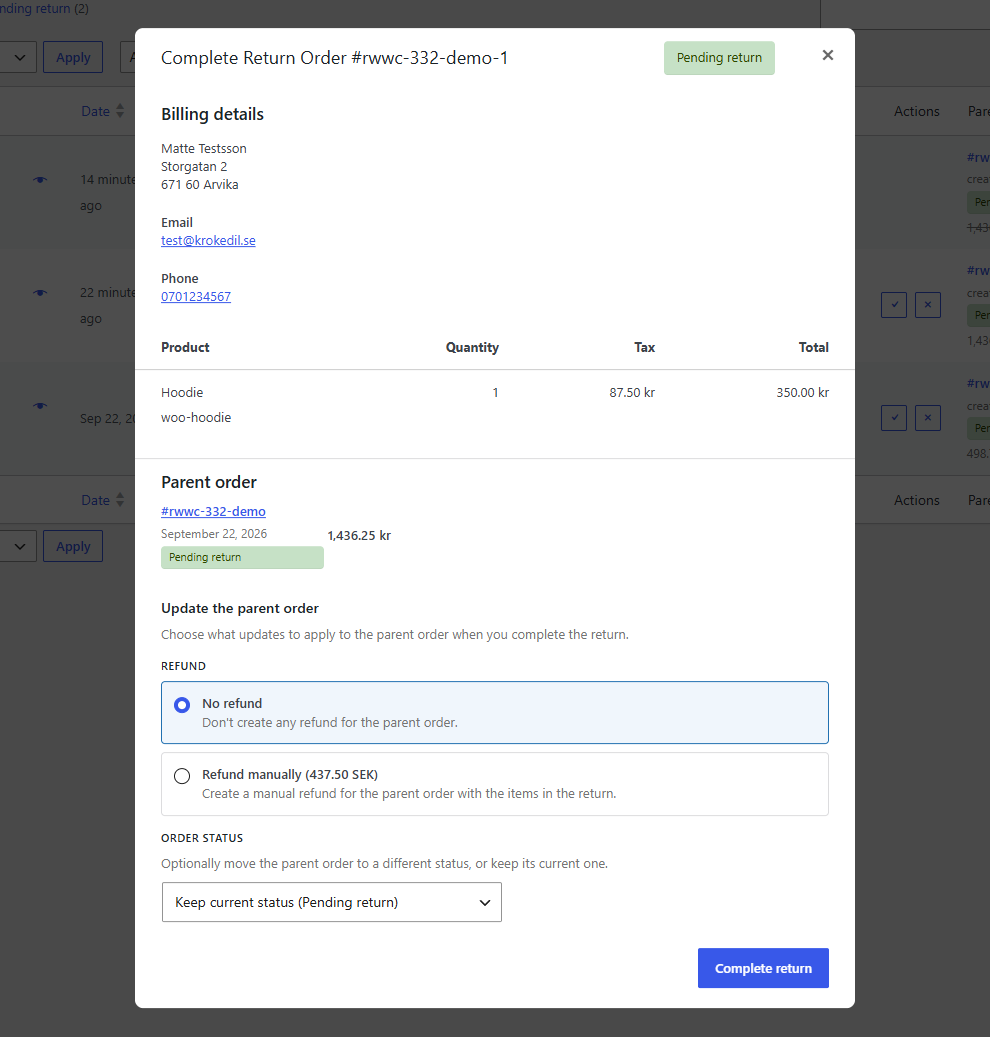
Update the parent order
Choose what updates to apply to the parent order when you complete the return.
- No refund – Select this option to not create any refund for the parent order.
- Refund manually – Select this option to create a manual refund for the parent order with the items in the return.
- Restock the returned item(s) – Check this box to restock the returned item(s). This option is only available when Refund manually is selected above.
- Order status – Optionally move the parent order to a different status, or keep its current one. This overrides the main Completed return order status setting.
- Click Complete return to finalize.
Finalise a return from the parent order:
- Open the parent Pending return order
- Scroll down to the Returns metabox and click Complete.

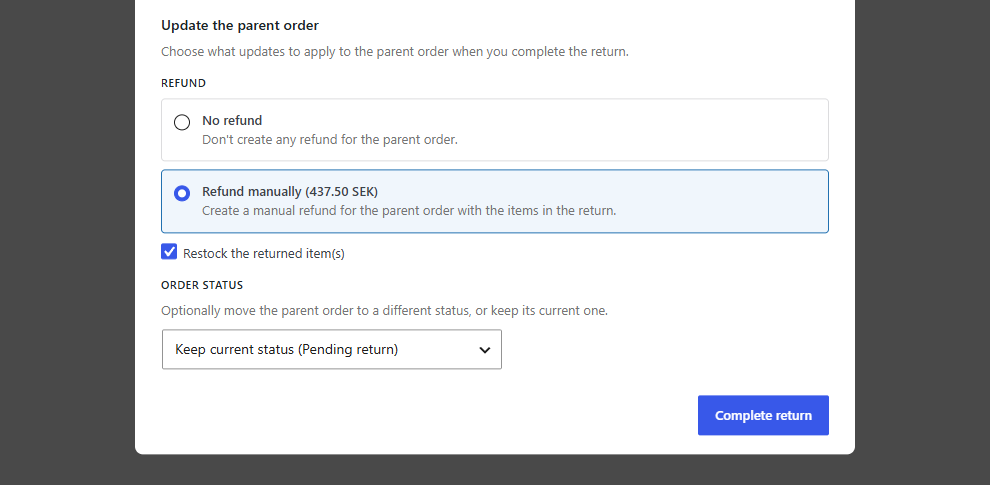
Update the parent order
Choose what updates to apply to the parent order when you complete the return.
- No refund – Select this option to not create any refund for the parent order.
- Refund manually – Select this option to create a manual refund for the parent order with the items in the return.
- Restock the returned item(s) – Check this box to restock the returned item(s). This option is only available when Refund manually is selected above.
- Order status – Optionally move the parent order to a different status, or keep its current one. This overrides the main Completed return order status setting.
- Click Complete return to finalize.
When the return is completed:
- A refund is created on the parent order for the refunded amount.
- The Returned column on the parent order updates to show how many of each line item have been returned.
- The parent order’s status is updated according to the Completed return order status setting, or your individually set Order status change. If set to Keep current status, the parent order is left as it is.

Free shipping
If you have Activate Free shipping coupon enabled and the customer chose to exchange items, the free-shipping coupon is created and made available to them. See Exchange coupons for more information.
Return shipping integrations
If the return shipping was created via Krokedil Shipping Connector, the return shipment number, label URL and QR code are stored on the return order and surfaced both in the customer email and the order notes.
For more information on Krokedil Shipping Connector, the see product page or documentation.
Email notifications
Two emails ship with the plugin:
- Return registration (customer) – sent to the customer when a return is registered.
- Return registration (admin) – sent to the shop manager when a return is registered.
Both can be enabled, disabled and styled under WooCommerce → Settings → Emails, like any other WooCommerce email.
Their content uses the same placeholders as the post-confirmation text – see Return form text and placeholders.