General information
Additional Klarna plugins
Klarna On-site Messaging
This documentation is for On-site Messaging when using Klarna Checkout for WooCommerce.
If you are looking for documentation for On-site Messaging for Klarna Payments for WooCommerce, please see this link.
As of version 3.5.0 of Klarna Payments for WooCommerce On-site Messaging is now a part of the Klarna Payments plugin.
Introduction
Requires Klarna Checkout for WooCommerce to be installed.
- Klarna On-site Messaging support High-Performance Order Storage (HPOS).
English: use the support form on krokedil.com to get help.
Svenska: använd supportformuläret på krokedil.se för att få hjälp.
Helpful information before you contact us can be found in the How to prepare a support ticket article.
Technical information – plugin data and changelog
English product page on krokedil.com
Svensk produktsida på krokedil.se
Required WooCommerce settings
You need to have an active SSL Certificate and HTTPS activated for On-site Messaging to work.
Installation
To install this plugin you first need to have Klarna Checkout for WooCommerce installed. You can find the links to this above.
You also need to have HTTPS activated.
There are two ways to install Klarna On-site Messaging.
Option 1 – via the WordPress plugin uploader:
- Download the .zip file via this download link
- Go to: WordPress Admin → Plugins → Add New and upload the file via Upload plugin.
- Install Now and Activate.
Option 2 – via the Klarna Add-ons menu in WooCommerce:
- Go to: WordPress Admin → WooCommerce → Klarna Add-ons
- Click on Not installed to install and then Activate.
Klarna Merchant Portal
To configure On-site Messaging you first need to log in to your Klarna Merchant Portal to retrieve some information needed later.
- Log in to your Klarna Merchant Portal.
- Navigate to Conversion boosters → On-site Messaging.
- Select your store and click Get started.
- Move on to Configuration

Configuration
Go to → WooCommerce → Settings → Payments → Klarna Checkout. At the bottom of the Settings page there is a section called Klarna On-Site Messaging.
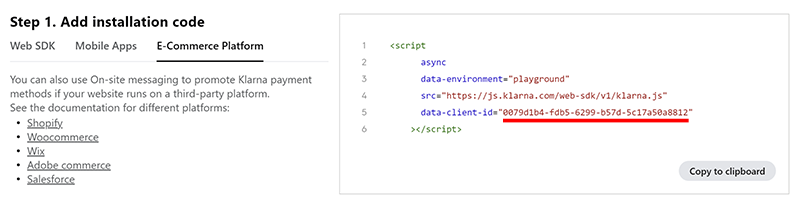
- Data Client ID – Enter the Client ID retrieved under the Conversion booster tab in your merchant portal. Copy the value entered inside the data-client-id (just the string inside the double quotes) and paste it in the settings field.
Please note that Client ID retrieved while the store being in Test mode will not work in Production mode, and vice versa.
- Enable/Disable the Product placement – Check this box to display On-Site Messaging on product pages.
- Product page placement data key – Enter the product page placement data-key (retrieved from your merchant portal).
- Product Placement Theme – Choose between none, light & dark.
- Product On-Site Messaging placement – Set where on the product pages the Klarna On-Site Message should be displayed.
- Enable/Disable the Cart placement – Check this box to display On-Site Messaging on the cart page.
- Cart page placement data key – Enter the cart page placement data-key (retrieved from your merchant portal).
- Cart Placement Theme – Choose between none, light & dark.
- Cart On-Site Messaging placement – Set where on the cart page the Klarna On-Site Message should be displayed.
- Enable custom placement hook – Check this box to enable custom placement hook.
- Custom placement hook – Enter a custom hook where you want the OSM widget to be placed. As an example we use
woocommerce_single_product_summary.
You can find a list of all WooCommerce action and filter hooks and where they operate here. - Custom placement hook priority – Set the priority for the custom hook where you want the OSM widget to be placed.
Now when you navigate to either a product page or the cart page you should see the widget that you setup in your merchant portal.
Changing widget location
In your Klarna settings there is a select option to select where on the page you want to display the widgets.You can also change the location of the individual widget by using the following filters:
- klarna_onsite_messaging_product_target for the Product page placement action.
- klarna_onsite_messaging_product_priority for the Product page priority.
- klarna_onsite_messaging_cart_target for the Cart page placement action.
- klarna_onsite_messaging_cart_priority for the Cart page priority.
Code example
// Change the placement action for the widget.
add_filter( 'klarna_onsite_messaging_cart_target', 'change_klarna_onsite_messaging_cart_location' );
function change_klarna_onsite_messaging_cart_location( $location ) {
    // Here you need to replace the $location variable with the action that you want to use instead of the default.
    // You can also add custom checks to apply different locations depending on your needs.
    $location = 'woocommerce_after_cart';
    return $location;
}
// Change the priority for the action for the widget.
add_filter( 'klarna_onsite_messaging_cart_priority', 'change_klarna_onsite_messaging_cart_priority );
function change_klarna_onsite_messaging_cart_priority( $priority ) {
// Here you need to replace the $priority variable with the action that you want to use instead of the default.
// You can also add custom checks to apply different priority depending on your needs.
$priority = '10';
return $priority;
}These can be used with any action that you want. You can find a list of all WooCommerce actions and where they operate here.
Display On-site messaging via shortcode
From version 1.3.0 you can display On-site messaging via the shortcode [onsite_messaging].
You can also configure the placement with the following shortcode attributes:
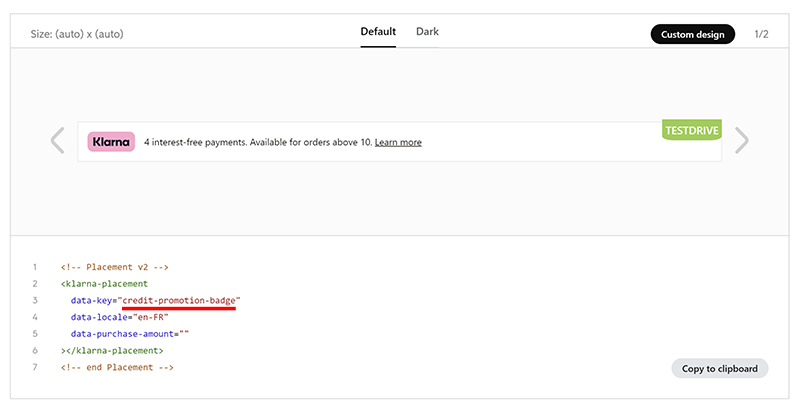
data-key(optional)
The type of placement button/image you want to display. Defaults tohomepage-promotion-wide. Look into your Klarna merchant account for possible data-key’s.data-theme(optional)
The theme/style used to display the button/image. Look into your Klarna merchant account for possible data-theme’s.data-purchase-amount(optional)
The specific amount used for the placement. Should be entered in cents/minor units (e.g 100 EUR = 10000).
If you use the data-purchase-amount shortcode on a product or cart page but have no amount specified it will automatically be populated based on the product price or order total.
An example shortcode could look like this:
[onsite_messaging data-key="credit-promotion-small" data-purchase-amount="89900" data-theme="dark"]
Display On-Site Messaging via widgets
You also have the possibility to configure and add a placement via WordPress Widgets.
- Navigate to Appearance > Widgets.
- Click Add block where you want to display the Klarna On-Site Messaging widget.

- Start typing Klarna On-site Messaging and click the widget when it appears.

- In the configuration of the widget you can add a Title, Placement Key and select the Placement Theme you would like to use.

- If you want to move the widget after you have configured it, you can click and hold Drag to move it to another Widget area.

Conditionally change the data client ID
/*
* The $client_id is the data client ID that you've entered in the OSM settings. You can overwrite it with the this hook.
*
* This function _must_ return a client id or OSM will fail to work. You may default to returning $client_id as in the example below.
*/
add_filter('kosm_data_client_id', function( $client_id ) {

	// your logic here...

	return $client_id;
});
Customize region dependent JS libraries
/*
 * This filter let you change which regional library to use, and is necessary if you want to display KOSM to customers from different regions.
 *
 * The library region must match the customer's region for KOSM to be displayed.
 *
 * Valid return values:
 * - 'na-library' for US, CA.
 * - 'oc-library' for AU, NZ.
 * - 'eu-library' for EU (default).
 */
add_filter('kosm_region_library', function( $region ) {
	return 'eu-library';
});
Force locale to a specific country
Klarna On-site Messaging listens to https://developer.wordpress.org/reference/functions/get_locale/ to set the locale. With this snippet you can force a specific country, Spain in the example below.
add_filter('kosm_locale', function($locale) {
	return 'es-ES';
});
Problems that might occur when optimizing your WooCommerce store when using an Iframe-based checkout
Optimizing can be very powerful when it’s properly configured but when using a Iframe-base checkout and their add-ons there can be compatibility issues.
Common issues:
- You are minifying/concatenate/caching HTML, CSS and JS-files.
This can result in that you do not see the On-site placement info.
Common plugins in use when these errors appears:
- Autoptimize
- SG Optimizer
- WP Fastest Cache
- WP Rocket
- W3 Total Cache
The summary of this is that if you use a Iframe-based checkout you should NOT do anything with the HTML, JS or CSS on the product / cart page.
Files to exclude from optimization
If you are using some kind of optimization feature there are files that needs to be excluded from any caching or concatenating.
For Klarna On-site Messaging for WooCommerce you need to exclude the following files:
- wp-content/plugins/klarna-onsite-messaging-for-woocommerce/assets/js/klarna-onsite-messaging.js
- eu-library.playground.klarnaservices.com
- eu-library.klarnaservices.com
- osm.klarnaservices.com
- x.klarnacdn.net
Theme support & compatibility
Krokedil and Klarna do not support individual themes. If you want to change the appearance of the widget outside of what we can do with the filter then this requires custom CSS code. Use the classes klarna-onsite-messaging-product and klarna-onsite-messaging-cart respectively.
FAQ
I have activated OSM (On-Site Messaging) for my store but it is not displayed to all customers
If the customer currency is not supported by Klarna, OSM will not be displayed.
I want to use a Custom Design that I made in the Klarna Merchant Portal but I can’t see the changes I make
To be able to see the Custom Design changes you need to set the setting Product Placement Theme to None and Cart Placement Theme to None.
OSM worked in test mode but not when the store is live
If you have had On-Site Messaging activated while testing your Klarna Checkout plugin you need to make sure that you enter the production Data client ID for OSM once you have unchecked Test mode and your store is live.
If you use the Data client ID retrieved while the store was in Test mode OSM will not work in production, and vice versa.
Why is the “credit-promotion-badge” not visible on products with a price over 100 Euro?
I have activated the placement “credit-promotion-badge” in OSM on my product page and I see it on products BELOW 100 Euro, but not on products OVER 100 Euro?
This might be because there is a upper limit for financing in your agreement with Klarna, this is probably why the credit-promotion-badge won’t show over a certain amount. Get in touch with the commercial team at Klarna if you want to change the limit in your agreement.