Introduction
Last modified:
Qliro for WooCommerce is a plugin that extends WooCommerce allowing you to accept payments via Qliro. It replaces the standard WooCommerce checkout page.
Qliro does not support the Checkout block in WooCommerce.
You can read more about this here.
Sign up with Qliro
You need to have an agreement with Qliro to be able to use this plugin.
Required WordPress/WooCommerce settings
- Make sure that you have enabled pretty permalinks in your WordPress installation. Otherwise callbacks from Qliro back to your store won’t work and orders will not be updated with the correct order status/information.
- To get the order total to match between WooCommerce and Qliro you need to configure WooCommerce to display prices with 2 decimals. More information about display of prices and how it can cause rounding issues can be found in this article.
- You need to have an active SSL Certificate and HTTPS activated.
- Your checkout page must use the Classic Shortcode block. Qliro does not support the Checkout block at this point. You can read more about this here.
- You can not alter, or add to, the
[woocommerce_checkout]shortcode when this is used.
Installation
From your WordPress Admin:
- In your WordPress admin, go to Plugins → Add Plugin
- Search for “Qliro for WooCommerce” and click the Install Now button.
- Activate the plugin.
From downloaded plugin file
- Download the plugin as a .zip-file from WordPress.org.
- In your WordPress admin, go to Plugins → Add Plugin
- Click on the Upload Plugin button, then click Browse to select the zip file from your computer. Once selected, click OK and then click the Install Now button.
- Activate the plugin.
Setup and Configuration
Before you get started you need to make sure you are using the checkout shortcode on your set Checkout Page.
The Checkout block is the default for new WooCommerce installations as of version 8.3. Qliro for WooCommerce does not yet support this.
Go to Pages → your set Checkout Page and transform the Checkout block to the Classic Shortcode block.

General configuration
Get started with Qliro for WooCommerce by adding the API credentials you recieved from Qliro and enable Qliro as a payment method.
- Go to: WooCommerce → Settings → Payments → Qliro
- Enable Qliro by checking the Enable Qliro as a payment method checkbox.
- Title – Enter the title for the payment method displayed in the checkout and order confirmation emails.
- Description – Enter the description of the payment method displayed in the checkout page.
API Credentials
- Production Qliro API key – Where you enter the API key received from Qliro.
- Production Qliro API Secret – Where you enter the API Password received from Qliro.
- Test Qliro API key – Where you enter the API Test key received from Qliro. Used if Test mode is checked above.
- Test Qliro API Password – Where you enter the API Test Password received from Qliro. Used if Test mode is checked above.
Debug
- Test mode – Check the Enable test mode checkbox to place the payment gateway in test mode when using test API keys. If not checked the payment method will function in a live production environment.
- Advanced demo mode – Check this box to Enable advanced demo mode, making it possible to test the Qliro payment solution in your store, without enabling Qliro for all customers.
For more information, see the Advanced demo mode section. - Logging – Check the Log debug messages to save debug messages to the WooCommerce System Status log.

Checkout configuration
Configure your checkout in relation to shipping, B2C/B2B purchases, newsletter signup and risk mitigations.
- Shipping within the Qliro iframe – Select if/how you want to integrate and display the shipping options inside of the Qliro checkout iframe.
Choose between No, WooCommerce shipping methods and Qliro integrated shipping with Ingrid. - Shipping section description – If WooCommerce shipping methods is selected in the setting above, you can display a custom text right under the shipping section’s main title.

- Country selector placement – Enables the possibility to switch billing country from the checkout page. Choose where on the checkout page you want it to be visible.
Choose between Inactive/shortcode placement, Above checkout form, Above order preview, Above payment form, Below order review, Below payment form and Below checkout form. - Allowed customer types – Qliro supports both B2C and B2B checkout flows. Select which flow you wish to use for you checkout.
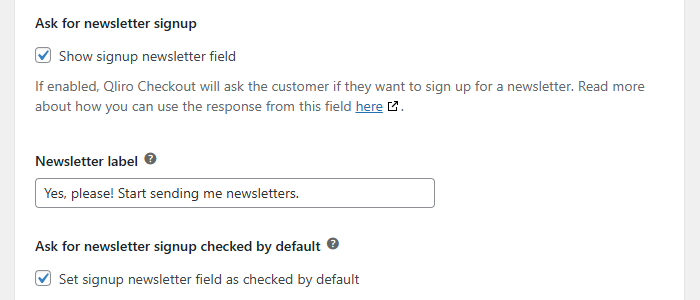
Choose between Both B2C & B2C, Only B2C and Only B2B. - Ask for newsletter signup – Check this box to display a newsletter sign-up checkbox for your customers. You can read more about how this is handled under Newsletter settings.
- Newsletter label – Customize the label for the newsletter signup checkbox.
- Ask for newsletter signup checked by default – Check this box to display an already checked newsletter sign-up checkbox for your customers. You can read more about how this is handled under Newsletter settings.

Risk mitigation
- Minimum customer age – Set the minimum customer age for all purchases.
This can also be set on an individual product level.
Please note that if this setting is active it prevents B2B purchases. - Require identity verification – Check this box to verify customers identity with BankID in Sweden.
Please note that this can lead to a double BankID verification requirement in certain instances. - Has risk – Check this box to flag all products as high-risk.
This can also be set on an individual product level.
Upsell on WooCommerce thank you page
The plugin Post Purchase Upsell for WooCommerce is needed to enable upsell on the WooCommerce thank you page.
- Upsell Percentage – Set the max amount above the order value a customer can add to a Qliro order paid with After Delivery payment. The default is 10%. If you want a higher percentage you first need to contact Qliro as this is regulated in your deal with them.
You can read more about Card, Swish and Bank transfer payments in the Qliro section of the Post Purchase Upsell documentation.

Please note that if you have Shipping within the Qliro iframe setting active, you need to have the correct shipping methods set up under WooCommerce → Settings → Shipping.
Read more about how to set up shipping in the iframe.
Order management settings
Manage settings related to an order after it has been created, such as when capture and cancelation with Qliro should be initiated etc.
If you don’t want to use Order Management you use the statuses None where applicable.
- Capture order status – Select what WooCommerce order status to use to initiate capturing the order in Qliros system.
For example, if this is set to Completed (recommended) it means that when an order is set to Completed in WooCommerce, the capture in Qliros system is initiated. - Cancel order status – Select what WooCommerce order status to use to initiate canceling the order in Qliros system.
- Calculate return fee – Check this box to calculate return fee when returning items automatically, if the refunded amount of an order line is less than the unit amount.
This setting is required for partial refunds. - Advanced pending status configuration – Check this box to enable advanced pending status configuration. This should only be used in advanced situations.

Advanced order management settings
- Pending capture order status – Select what WooCommerce order status to set the order to while WooCommerce waits for Qliro to tell us if the capture was successful or not.
- OK capture order status – Select what WooCommerce order status to set the order to when we get notified of a successful order capture from Qliro.
- Pending cancel order status – Select what WooCommerce order status to set the order to while we wait for Qliro to tell us if the cancellation was successful or not.
- OK cancel order status – Select what WooCommerce order status to set the order to when we get notified of a successful order cancellation from Qliro.

Please note that there can be issues when you deviate from the default plugin settings. Make sure you test your order flow after making changes to confirm everything is working as expected.
Checkout customization
Customize your checkout related to page layout, other payment method button text, colors and corner radius to make the look and feel of the checkout fit into your website in the best possible way.
- Checkout page layout – Choose the Checkout layout – One column checkout, Two column checkout (Qliro in right column), Two column checkout (Qliro in left column) or Two column checkout (Qliro in left column) – Storefront light.
- Customize other payment method button text – Customize the Select another payment method button text that is displayed in checkout if using other payment methods than Qliro. Leave blank to use the default (and translatable) text.
- Background color – Define the background color to use in the Qliro checkout iframe.
- Primary color – Define the color for the selected options throughout the checkout.
- Call to action color – Define the color for the Call to action-buttons throughout the checkout.
- Call to action hover color – Define the hover color for the Call to action-buttons throughout the checkout.
- Corner radius – Set a pixel value for rounded corners throughout the checkout. Leave blank, or set 0, for hard corners.
- Button corner radius – Set a pixel value for rounded corners on Call to action-buttons throughout the checkout. Leave blank, or set 0, for hard corners.

Please note that if you have made changes in the Checkout Customization that you can not see in your checkout you can try and view your site in a different browser or incognito mode.
You can also Clear customer sessions under WooCommerce → Tools
Widgets
Setup Qliro payment widgets and banner widgets on your website.
Banner widget
Promote Qliro payment methods and campaigns, without having to manually update banners continuously. You can also display it with the shortcode [qliro_one_banner_widget], read more about it here.
- Banner widget payment method – Select the payment method to be presented in the banner widget.
Choose between Campaign, Invoice and Part payment. - Banner widget placement on product pages – Select where you want the banner to be displayed – Inactive/shortcode placement, Above title, Between Title and Price, Between Price and Excerpt, Between Excerpt and Add to cart button, Between Add to cart button and Product meta, Between Product meta and Product sharing buttons or after Product sharing buttons.
- Banner widget placement on cart page – Select where you want the banner to be displayed – Above cross-sell, Above cart totals, Between cart totals and Proceed to checkout button or at the Bottom of the page.
- Banner widget styled shadow – Check this box to display the banner with a Qliro style shadow.
Product widget
Presents a suitable payment method based on the price of the current product. You can also display it with the shortcode [qliro_one_payment_widget], read more about it here.
- Payment widget placement on product pages – Select where you want the banner to be displayed – Inactive/shortcode placement, Above title, Between Title and Price, Between Price and Excerpt, Between Excerpt and Add to cart button, Between Add to cart button and Product meta, Between Product meta and Product sharing buttons or after Product sharing buttons.
- Payment widget condensed copy – Check this box to display the payment widget in a more condensed and shorter style.


Product level settings
Some of the settings available in the Risk mitigation part of the Checkout configuration settings can be applied on a product level instead of store-wide. This is useful if the settings don’t have to apply to all products.
Navigate to Products → All Products and click on the product you wish to configure.
Below the Product description metabox you will find the box called Product data. In this box you have the tab Qliro.
- Minimum customer age – Set the minimum customer age for this product.
- Require ID verification – If this box is checked and the customer is from Sweden, identity verification with BankID will be required for every purchase of this product.
This can result in a double BankID verification requirement in some cases. - Has risk – Check this box to flag this product as high-risk.

Country selector
With Qliro for WooCommerce you have the option to display a country selector on your checkout page(s) when Qliro is the chosen payment method.
You have the option to choose between:
- Inactive/shortcode placement
- Above checkout form
- Above order review
- Above payment form
- Below order review
- Below payment form
- Below checkout form
If you choose Inactive/shortcode placement, this is the shortcode to use: qliro_country_selector

Order Management
When an order is created in WooCommerce and a reservation number exists in Qliro’s system, you have the possibility to handle the order in Qliro directly from WooCommerce. This way you can save time and don’t have to work in both systems simultaneously.
Read more about order management in Qliros system directly from WooCommerce in the Qliro Order management documentation.
Subscription support
Qliro is compatible with the WooCommerce Subscriptions extension for handling recurring payments.
Read more about recurring payments with Qliro here.
Currencies
The plugin itself has no limitations regarding currency.
However, please note that there can be limitations in the agreement you have with Qliro.
When it comes to questions regarding supported currencies you should always talk to your payment provider. The exception is when the plugin in fact does have limitations.